5 Best Fixes for Ditch Lining Cracks After Pouring?

Time:2026-10-27 Author:Mason
0%

Freshly poured ditch lining should look continuous, firm, and properly bonded to the channel base. Yet fine cracks may appear within hours or days. They often follow the ditch’s edges, cross the surface like thin spider webs, or widen near joints and outlets. Water then enters these openings, carries soil beneath the lining, and slowly weakens the structure.

If you are asking, “why is my ditch lining cracking after pouring,” the cause may involve several conditions. Rapid drying, poor curing, excessive water in the mix, ground movement, and inadequate reinforcement can all contribute. Heavy rain or early water flow may worsen the damage. Sometimes, the original installation looked acceptable, but hidden settlement later revealed a weakness. That assumption can be wrong.

This guide presents five practical fixes for ditch lining cracks after pouring. It explains how to inspect crack width and depth, remove loose material, select suitable repair compounds, improve curing, and address drainage or soil movement. The recommendations reflect common concrete repair practices, but every site has different soil, weather, and loading conditions. A narrow surface crack may need sealing, while a widening crack with exposed reinforcement requires professional assessment. Do not simply cover it.

Look closely. Repair timing matters. Photographs, measurements, and moisture observations can help confirm whether the crack is stable. When uncertainty remains, consult a qualified concrete or drainage specialist before applying a permanent repair.
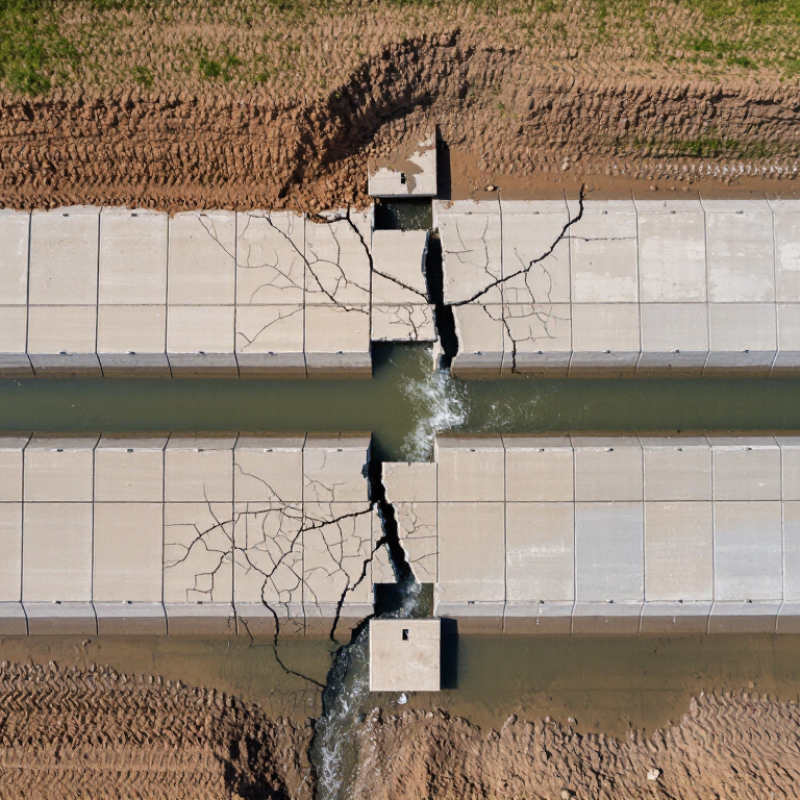
5 Best Fixes for Ditch Lining Cracks After Pouring?

Identify the Causes and Severity of Cracks in a Newly Poured Ditch Lining

Fresh ditch lining cracks are not automatically structural failures. Their cause and depth must be confirmed before repairs begin. Hairline cracks often result from drying shrinkage, rapid moisture loss, or poor curing. They may appear within hours as pale lines across the surface.

Look closely.

Wider cracks can indicate subgrade movement, uneven support, thermal stress, or excessive water pressure behind the lining. Severity depends on width, depth, pattern, and movement. Measure each crack with a ruler and record its location, length, and date.

A stable crack below about 0.3 millimeters may need monitoring and surface sealing. Cracks wider than 0.5 millimeters, exposed reinforcement, hollow-sounding concrete, or visible leakage require professional assessment.

Displaced edges are more serious. They may show that the base has shifted. In that case, sealing alone will fail. The damaged section may need removal, subgrade correction, drainage improvement, and controlled re-pouring.

Narrow cracks can often be cleaned, dried, and filled with a suitable flexible sealant. Larger cracks may require injection repair or reinforced patching. Damaged joints should be rebuilt, not simply painted over.

Tips: Protect new lining from direct sun and strong wind during curing. Keep the surface evenly damp without washing cement paste away. Check the ditch after heavy rain, especially where cracks cross the flow path. I have seen small cracks become worse when water entered an unsealed edge. That detail is easy to miss. Repair timing matters, but correct diagnosis matters more.

Clean and Prepare Cracks Before Applying Any Repair Material

Ditch lining cracks should be cleaned and assessed before any repair material is applied. A dusty crack can make strong products fail. Start by removing standing water, mud, laitance, and loose concrete. Use a stiff wire brush, cold chisel, or low-pressure air. Avoid forcing debris deeper into the lining.

Inspect each crack under good light. Measure its width and depth, then check nearby areas for hollow sounds or flaking edges. Stable hairline cracks may accept epoxy injection. Wider cracks often need routing into a clean V-shaped groove before sealing.

Flexible sealant suits cracks that move with temperature changes. Polymer-modified repair mortar works for chipped edges and shallow surface breaks. Severe cracking may require removing and repouring a section of the lining.

The surface must match the repair material’s requirements. Some products need dry concrete, while others bond better to damp, saturated concrete. Read the technical data sheet carefully. Do not guess. A vacuum can remove fine dust after brushing, and a clean, damp sponge can remove remaining residue. Let excess water drain away.

I have seen repairs fail because the crack looked clean but still held powder inside. Mark active leaks and repair drainage problems before patching. If cracks cross the full lining thickness or continue widening, request an engineer’s inspection before proceeding.

Seal Narrow Surface Cracks with a Suitable Concrete Repair Compound

5 Best Fixes for Ditch Lining Cracks After Pouring

Small cracks can appear in a fresh concrete ditch lining after pouring. Shrinkage, rapid drying, weak curing, or slight ground movement may cause them. Narrow surface cracks are usually repairable, but they should not be ignored.

Start by inspecting the crack width and direction. Remove dust, loose particles, and laitance with a stiff brush. Let the surface dry fully before applying a suitable concrete repair compound. Choose a compound designed for exterior concrete and compatible with the lining material. Press it firmly into the crack, then smooth the surface with a putty knife. Keep the repaired area protected from heavy water flow during curing. If cracks widen, repeat, or expose reinforcement, seek advice from a qualified concrete professional.

Tips: Check cracks after rain and again after several dry days. A clean, dry surface improves adhesion. Do not fill an active, moving crack without addressing soil movement first. Follow the compound’s mixing ratio and curing time carefully. I have seen rushed repairs fail because the surface looked dry but still held moisture. That detail is easy to miss. Also, avoid sealing only the visible opening when the crack extends beneath the surface. A wider structural crack needs assessment, not just filler.

Inject and Stabilize Deep Cracks to Restore Lining Strength

Deep cracks in a newly poured ditch lining need more than surface patching. Field inspection should begin with crack width, depth, moisture, movement, and hollow-sounding concrete nearby. ACI 224R notes that drying shrinkage commonly reaches about 400 to 800 microstrain, depending on the mix and environment. That movement can reopen a poorly treated repair.

Five practical fixes work together: clean the crack, remove weak edges, route unstable sections, inject dormant deep cracks, and stabilize the surrounding lining. Low-viscosity epoxy can restore continuity when the crack is dry and no longer moving. For wet or active cracks, a flexible injection material may be more suitable. The U.S. Army Corps of Engineers’ concrete repair guidance separates structural crack injection from water-control treatments, which is an important distinction.

Injection ports should be spaced along the crack, not placed randomly. Pressure must remain controlled; excessive pressure can lift weak concrete or force material into the soil. After injection, damaged zones may need localized rebuilding with compatible repair mortar and reinforcement anchoring. ACI 546R recommends matching repair materials with the existing concrete’s strength, shrinkage, and permeability.

This is not magic. I have seen repairs fail because crews injected dust, ignored drainage, or sealed an actively moving crack. Record crack widths, repair dates, moisture conditions, and follow-up readings. A 30-day and 90-day inspection can reveal whether the lining is stabilizing or quietly separating again.

Replace Severely Damaged Sections and Prevent Future Cracking

Ditch lining cracks rarely have one cause. Drying shrinkage, weak subgrade, poor joints, and trapped water often act together. ACI 209.2R reports typical concrete drying shrinkage near 300 to 800 microstrain, depending on materials and curing. That movement can open narrow cracks across long, rigid ditch panels.

Start with a close inspection after the surface dries. Mark crack width, length, depth, and leakage points. Remove loose concrete with light tools, not aggressive impact. Sections with exposed steel, hollow sounds, soil loss, or active seepage should be replaced, not covered with mortar. Cut back to sound edges, clean the base, restore compaction, and install new concrete with properly spaced control joints. This repair is slower. It is usually safer.

Prevention begins before pouring. FHWA drainage guidance emphasizes stable support, positive drainage, and suitable joint spacing for concrete channels. Keep the subgrade damp, but never muddy. Use measured water, adequate reinforcement, and continuous vibration without segregation. Protect fresh lining from rapid drying for at least several days, following the specified curing method. ACI guidance commonly recommends limiting uncontrolled evaporation during early curing. Windy afternoons are risky.

One detail is easy to miss. The ditch may crack because water moves beneath it. Add filters, outlets, or drainage relief where groundwater pressure exists. Review the repair after the first heavy storm. My own field lesson is simple: a neat patch can hide a moving problem. When movement continues, replacement must include the cause, not only the visible crack.

FAQS

Why must a ditch lining crack be cleaned before repair?

Remove standing water, mud, laitance, loose concrete, and powder. Use a stiff brush, chisel, or low-pressure air. Do not drive debris deeper. Dust can quietly ruin a strong repair.

How should a crack be assessed before choosing a repair material?

Inspect it under good light. Measure its width and depth. Check for hollow sounds, flaking edges, moisture, and movement. The crack’s behavior matters more than its appearance.

Which repair method suits a stable, narrow crack?

A dry, dormant, hairline crack may accept low-viscosity epoxy injection. The surrounding concrete must be sound. If the crack moves, rigid injection may fail.

What should be done with a wider or unstable crack?

Remove weak edges and route the crack into a clean V-shaped groove. Fill it with a compatible repair material. Some grooves look neat but remain dusty inside.

Which material suits cracks affected by movement or moisture?

Flexible sealant or flexible injection material may suit wet or active cracks. Rigid materials can reopen when temperatures change. Choose according to movement and moisture conditions.

How should deep cracks in a lining be injected?

Place injection ports along the crack at planned intervals. Control pressure carefully. Excessive pressure can lift weak concrete or push material into surrounding soil. Random port placement is unreliable.

When might a damaged lining section need rebuilding?

Chipped edges and shallow breaks may need polymer-modified repair mortar. Deep damage may require localized rebuilding and reinforcement anchoring. Severe cracking can require removing and repouring the section.

When should an engineer inspect the lining?

Request inspection when cracks cross the full lining thickness or continue widening. Record widths, moisture, repair dates, and conditions. Recheck the area after 30 and 90 days. Repairs can appear successful, then separate quietly.

Conclusion

Cracks in a newly poured ditch lining can result from rapid drying, poor surface preparation, excessive water in the mix, ground movement, or inadequate curing. Understanding why is my ditch lining cracking after pouring is the first step toward choosing the right repair. Begin by examining the crack width, depth, location, and surrounding concrete. Clean away dust, loose fragments, dirt, and moisture so the repair material can bond properly.

For narrow, shallow cracks, apply a compatible concrete repair compound and smooth the surface carefully. Deeper or spreading cracks may require injection with a suitable strengthening material to stabilize the lining and restore its structural performance. If sections are badly broken, displaced, or weakened, remove and replace the damaged concrete rather than relying on a surface patch. Future cracking can be reduced through proper mix control, reinforced construction where needed, gradual curing, effective drainage, and protection from extreme temperature changes during the early hardening period.

Mason

Mason

Mason is a seasoned marketing professional with a deep expertise in the company's offerings and a passion for driving brand awareness. With a strong background in digital marketing strategies, he has an innate ability to connect with diverse audiences and effectively communicate product benefits.......